Tuesday, 22 January 2008

Birch Bur Kuksa

I've been wanting to try carving a kuksa from a Birch bur and finally got the chance to do it. The Birch bur is an abnormal growth on the trunk of the tree


Which yields a beautiful grain pattern when carved. Here is the kuksa I have carved which requires some sanding and then oiling to bring out the grain pattern.


Once completed and oiled, I will add another picture below.

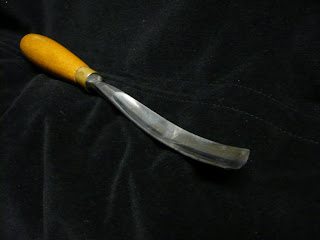
For Louie, 90% of the work was done with this gouge chisel which is currently a favourite tool to work with, second only to my knife.

Saturday, 19 January 2008

Woodcock

I disturbed two Woodcock while out walking today. The picture below was taken where one a the birds was feeding and shows its two footprints and numerous holes where it had been probing with its long bill to find invertebrates.

You can find out more about Woodcock here;

http://www.rspb.org.uk/wildlife/birdguide/name/w/woodcock/

Thursday, 17 January 2008

Pocket bow-drill-2

The final design of my pocket bow-drill kit is now completed.

It works incredibly well and I am really pleased with the result, both for making fire and drilling holes using a flint tip.

My favourite combinations of wood for the bow-drill are a Hazel drill and Willow hearth.

Tuesday, 15 January 2008

Celebrating Birch

There is a new book about to be published called "Celebrating Birch" which some of you might be interested in.


"If you think of birch as simply a wood to work with, think again. For centuries, this legendary tree has been vital to the survival of mankind and is celebrated by cultures around the world. In this stunning salute, the "North House Folk School" will delight your curiosity with the fascinating history and myths of the birch, while sharpening your woodworking skills with 15 beautiful projects that include carved ornaments, turned bowls, bark baskets and more."

I pre-ordered my copy with Amazon Uk and the delivery date is estimated to be the first week of February.

Sunday, 13 January 2008

Boiling water with hot rocks.


Another method of boiling water in wood or bark vessels is to heat rocks in the fire and using a pair of simple tongs, transfer them into the vessel of water and the heat released from the rocks will boil the water.


This method can also be used to cook food.

Friday, 11 January 2008

Boiling water without a cooking pot

You may need to boil water for cooking or to purify it and to do this it is not necessary to have a metal cooking pot. If you have with you or can find a glass or plastic bottle, this can be utilised as a vessel to boil water.

Remove some embers from your fire and then fill the bottle with water and place in the embers (do not put a lid on the bottle!!!). The glass will not crack or the plastic melt because the water absorbs the heat from the fire. You must ensure that any flames do not go higher than the water level and that the bottle does not boil dry.

Here I am boiling water in a plastic bottle.

and here is a piece of video of me boiling water in a glass bottle.

Wednesday, 9 January 2008

Song Thrush feeding site

While out walking the other day I noticed a large number of broken snail shells (all Helix species.) scattered across the path.


This is typical of a feeding area of the Song Thrush. The Song Thrush uses a stone as an anvil to hit the snails on to break open the shell. In the picture above you can see the anvil just above the centre of the picture.

Here is a closer view and notice how the algae has been worn off by the repaeted smashing of snail shells.

Monday, 7 January 2008

Knotless netting

I have been off work today with a cold and asthma, so needed a simple project I could do the inside. About a year ago I was shown the principles of knotless netting and decided to try and make a carrier for a large bottle.

I have used para cord below to show how the principles of this method work. Loop the cord (I used my fingers as a gauge) around a gauge and then thread the cord three times around it's self and then make the next loop and repeat the above.

I used gardeners hemp, threaded on a bone needle to make the bottle carrier and used two fingers as a gauge for the netting size.

For the base I reduced the netting size to one finger and tied the last row of mesh together to finish the carrier off. I made the carrying strap using a four strand round plat.

The benefit of this knotless netting carrier is that you can undo the string if you need it or net a different item to meet you needs.

Sunday, 6 January 2008

Pocket bow-drill

I am now working on producing a mini or pocket bow-drill based on my larger version here

The design and specifications are not perfected yet, but yesterday I achieved an ember in 9 seconds.

I hope this size and design will be good for teaching fire by friction as I find they struggle to achieve sufficient pressure on a full sized set.

Saturday, 5 January 2008

Primitive vice

In order to work on small pieces of bone, flint and antler I have made a very simple vice which works very well. I split a piece of Hazel a few centimeters along it's length using a flint wedge and pointed the other end to push into the ground. In the picture below I have a flint saw secured and am using it to cut through a piece of bone.

The addition of a piece of Ash wood to rest the vice on adds to its stability, allows more pressure to be applied and by moving the piece of Ash nearer of further away the height can be adjusted.

The vice can be held against the wood using the foot or knee.


John Lord sets small pieces of flint into a split stick to pressure flake them and I used this method to make my drill tips in the post below.

Thursday, 3 January 2008

Bow-drill

A friend (Will) of mine was shown how to make fire by friction by Patrick Cave-Brown. He used a system based on the Egyptian Bow-drill. Will had made several different bow-drill sets on his pole-lathe and gave them to me to test. From those tests I designed a set specific for me which we then made and this is it.

The drill is made from Ash and has a tapered hole in the bottom into which a wooden plug is inserted. The plug in this picture is made from Hazel. The other end of the drill has been reduced in diameter and fits into a hole drilled in the bearing block (made from Yew in this case). The base of the bearing block sits on the "shoulder" of the drill and once a polished finish is achieved between the two pieces of wood an almost frictionless joint is achieved! The fastest I have produced an ember with this system so far is 10 seconds and have never failed to achieve an ember while using it. My preferred woods thus far are a Hazel drill tip and Cricket Bat Willow hearth.

I have now pressure flaked some flint "drill bits" and set them into wooden plugs using Lime bark cordage as a lashing and a mix of pine resin and bees wax.

The primitive "drill bit" is then inserted into the end of the bow-drill.

Here I am using it to drill a hole through a piece of antler and it works incredibly well.

Tuesday, 1 January 2008

Power Monkey eXplorer

I have just purchased a Power Monkey eXplorer mobile charger with solar-slave and plan to test it here in the UK and on my next trip to Lapland. I will then write a review of the product on my blog.

Also included in the kit is a variety of mains adapters for all over the world, adapters for charging a variety of electronic equipment including ; iPOD, PSP, Nokia and many more.

It should prove particularly useful at my cabin as there is now power there for recharging camera and mobile phone batteries.

The power unit can be charged via the mains, the solar-slave or a laptop via a USB port.

Detailed specifications and more general information can be found on the website

The best price I could find for this product was here

So far I am very impressed with the Power Monkey explorer, but watch this space for a more detailed review over the next month.