Monday, 31 March 2008

Bark chisel


While out walking with friends yesterday, we came across some recently felled Birch logs, with some nice sections of reasonably thick (for England anyway) bark. When removing bark from a tree it is helpful to make a simple tool which I call a bark chisel, to help separate the inner bark from the outer bark.


I cut a piece of Ash and removed any rough knots that might tear the bark.

I used the end of a Birch log as a rest for safer and more secure working and ensured I was holding my work off to one side of my body when cutting to help avoid accidents.

I shaved one end flat with my knife to form the chisel.

Saturday, 29 March 2008

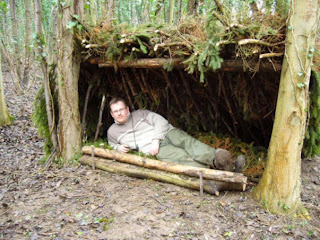
Lean-to shelter

There are many adaptations for the lean-to shelter, depending on the circumstances and materials available.

In this case I used a horizontal ridge pole supported by two trees at either end with dead leaned against it and a piece of parachute material secured over to wick away any rain. The bed is made of spruce boughs.

Here we used Spruce boughs as thatching for the roof and this created a very effective waterproof cover. The bed is again made of Spruce boughs. The two logs across the front of the shelter prevent the occupant rolling into the fire when sleeping.

Here we are using leaf litter as covering for the roof, held in place with a second layer of dead wood.

The most effective type of fire-lay for this shelter (particularly in cold weather) is the long log fire.

With this lean-to which I used on a survival course in Canada, I have incorporated a raised bed, lined with Spruce boughs. In this case I was sleeping in this shelter at -22 degrees, without a sleeping bag.

Thursday, 27 March 2008

The Science Of Survival

The Royal Institutions Christmas Lectures 2007 were entitled "The Science of Survival" and as anyone who saw them will know, they were shown on Channel Five over Christmas.

The five lectures looked at our bodies and the nature of our will to live and included special guests with amazing stories of surviving against the odds.

These lectures are now available on DVD price £6 (including delivery) and I recommend purchasing a copy to anyone interested in the subject of survival and the bodies requirements to function normally and stay alive. There are lots of useful facts, information and demonstrations contained within these lectures.

You can find out more and order your copy here.

Tuesday, 25 March 2008

Cooking eggs in a campfire

Here are a couple of ways of cooking eggs in a campfire.

First cut an onion in half and scoop out the middle layers to form a cup. Break an egg into this cup.

Place in the embers of your fire and leave to cook.


The egg absorbs the flavour of the onion as it cooks.

Another method of cooking an egg is to cut one end off of a large potato, then hollow the potato out and crack an egg into it.

Wipe some egg white around the top of the potato and place the top back on. Wrap the potato in foil and place in the embers and leave to cook for 40 -50 minutes. This is the end result.

Sunday, 23 March 2008

A snowy day out

I was up early this morning to make the most of the weather conditions.

After a long walk, I headed in to the woods to find shelter, make a fire and have some lunch. You can see that this Spruce tree would provide shelter as there is no snow beneath it, but it is still rather exposed.

This fallen, Ivy covered tree provides shelter and is much less exposed, so this is where I decided to stop. The ground beneath was dry and there was sufficient dry, dead wood within as fuel for a fire.

My first task was to clear the ground of leaves and debris and to remove settled snow from above the fire site because it would melt and then drip onto me and the fire. Then I made a platform from dead wood to make my fire on. Using a firesteel with two feather sticks and some Birch bark from by tinder pouch, I made a fire.

My next task was to get some water boiling to enable me to make coffee and soup.

Having soup would give me the chance to try out the new Birch bowl I had completed yesterday.

The water took about ten minutes to boil and I soon had coffee and a warm bowl of soup prepared.

All I had to do then was sit back and enjoy it.

Friday, 21 March 2008

Coltsfoot

As Treewright mentioned in his comment, Coltsfoot or Cough Wort (Tussilago farfara - Tussilago meaning cough) is now flowering. The plant is quite unique as the flower appears before the leaves giving it another name of "son before the father".

Coltsfoot has been traditionally used in the treatment of coughs and chest complaints and is used in some herbal cough mixtures that I have used. The leaves were also dried, shredded and then smoked to relieve cough symptoms. The high levels of Zinc found in this plant help to boost the immune system.

The leaves can be eaten raw or cooked, but taste rather bitter. Certain alkaloids found in this plant can have a toxic effect on the liver, so it is probably best avoided.

The leaf can be seen in this picture, but grows much larger as the season progresses and can be 8 - 10 inches in diameter.

European Coltsfoot should NOT be confused with American Coltsfoot which is a member of the Petasites family, a relative of our Butterbur (Petasites hybridus).


The leaves of this plant can be dried and burnt, then the resulting ash residue used as a salt substitute for stews. I have used Coltsfoot leaves in the same way and it does work.

Wednesday, 19 March 2008

Greater Plantain

My favourite plant, Greater Plantain (Plantago major) is just emerging again.

I like to eat it raw, but it can also be cooked. Some will tell you to remove the stringy leaf ribs but I do not bother.

I use it to staunch blood flow from cuts, which it does very effectively. It also contains allatoin which is found in human DNA and promotes cell growth and re-generation. Some Hay fever sufferers find relief from the congestion symptoms by chewing a leaf. If you have skin irritation such as an itching insect bite, plantain juice applied to it will give almost instant relief.

The native people of North America referred to it as "white mans footstep" because it wass introduced by European settlers and spread across the country with them.

Monday, 17 March 2008

Welney Wildfowl and Wetlands Trust Reserve

Yesterday I was at Welney Wildfowl and Wetlands Trust Reserve , situated on the Ouse Washes in Norfolk.

Welney is a reserve that is very close to my heart because it is where I started my career in nature conservation when I was twelve years old, cycling 12 miles from my home to work as a volunteer there most weekends.

In winter my job was mainly checking visitors tickets at the entrance gate or talking with visitors and helping them to identify birds from the hides. I was also given time off from school to assist with trapping swans and ducks to ring them to help with research into there migration patterns.

In summer I spent more time assisting with practical management tasks such as mowing paths and pollarding willows. Pollarding is a very old tradition which involves removing limbs at a height at which grazing animals can not eat the regrowth. The resulting material (depending on its age) could be used for making eel traps, baskets, fire wood and fodder for livestock.

The Ouse Washes was designed as a water storage facility to help drain the surrounding fen and in normal years it would flood in winter and then dry out in summer and graziers would then put livestock on to graze the lush vegetation. Unfortunately these days, for a variety of reasons the site can have flood water on for most of the year. To find out more about the Ouse Washes visit;

http://en.wikipedia.org/wiki/Ouse_Washes

Saturday, 15 March 2008

Rib bone netting needle

I found this old rib bone while out walking and it occurred to me that it might make a very good netting needle for.

As I abraded the edges with a piece of flint I noticed the bone possessed two laminated layers.

I battened my knife between the layers to split the bone in half.

I used a piece of flint to abrade the edges of the bone to produce the basic needle shape. I made a prototype pump drill with a flint tip, to drill a series of holes through the bone. Using a piece of flint to connect the holes, I formed the tongue of the needle. I completed the needle by using a combination of an abrasive stone and a piece of file, to smooth the edges of the needle. The completed needle is 220mm long and 22mm wide.

Here are the tools I used to make the needle.

and here you can see some of the netting I have made with it.

Thursday, 13 March 2008

Bucksaw

My bucksaw featured in a previous picture and is quite simple to make. There a many different designs of bucksaw and this is mine.

I prefer to use an Ash sapling, but Hazel, Wych Elm and many other woods will work just as well.If selected carefully, all the parts for this saw can be cut from one sampling. The two vertical piece have a groove cut in at the bottom using either a knife saw or piece of flint. This is where the saw blade will sit. About 25mm down from the top of the two vertical pieces I cut a small groove around into which the tensioning cord will sit. To secure the horizontal piece in place, I make a mortise and tenon joint.

Finally I make two wooden dowels which fit through the holes at each end of the blade to help hold it in place, put loop of cord around the top and using another piece of wood, twist the cord to tension the saw frame. Now it is ready for use.

Tuesday, 11 March 2008

Wind damage

Whenever we have strong winds, it tends to create a lot of work for us clearing trees which have blown across paths and fences.

We cut up the trees using chainsaws and pile most of the material nearby to create habitat piles for small mammals and insects.

Of course fallen trees also supply me with wood for projects. I am currently making a kuksa and dough bowl out of a piece of this Birch.

A group shelter in the woods where I run my courses had a lucky escape when this Wych Elm came down.

Although the door was smashed the rest of the shelter was left intact. I am still rather pleased that I wasn't sleeping in it at the time though!

Sunday, 9 March 2008

Pigeon food

If you are walking through a woodland at the moment and pass an Ivy (Hedera helix - helix meaning to twist or spiral) covered tree, it is likely you will hear a clatter of wings as Wood Pigeons erupt from the leafy cover. They are feeding on the berries of the Ivy, one of the few natural fruits ripening at this time of year, particularly useful when berries from other sources such as Hawthorn have been exhausted over the winter period.

The green berries are numerous this year and grow in small clusters.


The waxy leaves of Ivy are particularly good to use in your bow-drill bearing block to reduce friction.

Friday, 7 March 2008

Bow-lathe

As my friend Robin at Treewright has just posted in a previous thread I thought I would promote him EVEN MORE!!! by showing you something he demonstrated to me when we were working together at the Scout Jamboree last summer.

Not everyone has the materials, time or space for their own pole-lathe, but a bow-lathe is a small and simple alternative. Below is a picture of Robin in action using his bow-lathe.

I guess you could say that it is based on the principle of the bow-drill, because you use a bow to rotate your work instead of foot power as used with a pole-lathe.

All you need is a stable base (I used a piece of scaffold board for mine) and two uprights fixed securely to the base. Drill a hole towards the top of each upright and insert a coach screw (or similar) through each, having ground a point onto each bolt to hold your piece of work securely. Use two nuts to secure the bolts in position.


At one end you can incorporate a simple wooden handle to tighten one bolt to hold you work.


and finally fix a piece of wood between the two uprights as a tool rest


Now axe a length of wood into a rough "round", place the bow string around using the same method as with the bow-drill and secure your work between the two bolts.

Now using a couple of bodgers chizels, move the bow backwards and forwards to rotate your work and turn the wood into whatever you require!

Wednesday, 5 March 2008

Adders

Although it was a frosty start to the day again today, the sun soon warmed things up, so this afternoon I went to look for the first Adders of the year emerging from their hibernaculums on one of our sites.

Two areas of the reserve are particularly good for them and one was present at each site. There are two distinct colour variations between the two locations.

Here is the first sighting of the day...

and here is the second...

Due to the cooler temperature this afternoon, the snakes were slightly lethargic and so I could get to within 8 inches of them. Both pictures are taken with my Panasonic Lumix set on wide angle.

And in case you have never seen an Adder uncurled here is one...


To find out more about the Adder in the UK look here; http://www.herpetofauna.co.uk/adder.htm